Learn how to view and manage your Suppliers on PurchasePlus.
If using PurchasePlus as a Purchaser, you can view and manage the Suppliers that you are connected to.
Jump to:
- Viewing My Suppliers
- Edit Supplier Settings
- Supplier Destinations
- View Supplier Catalogs
- View Supplier Purchase Orders
- View Supplier Invoices
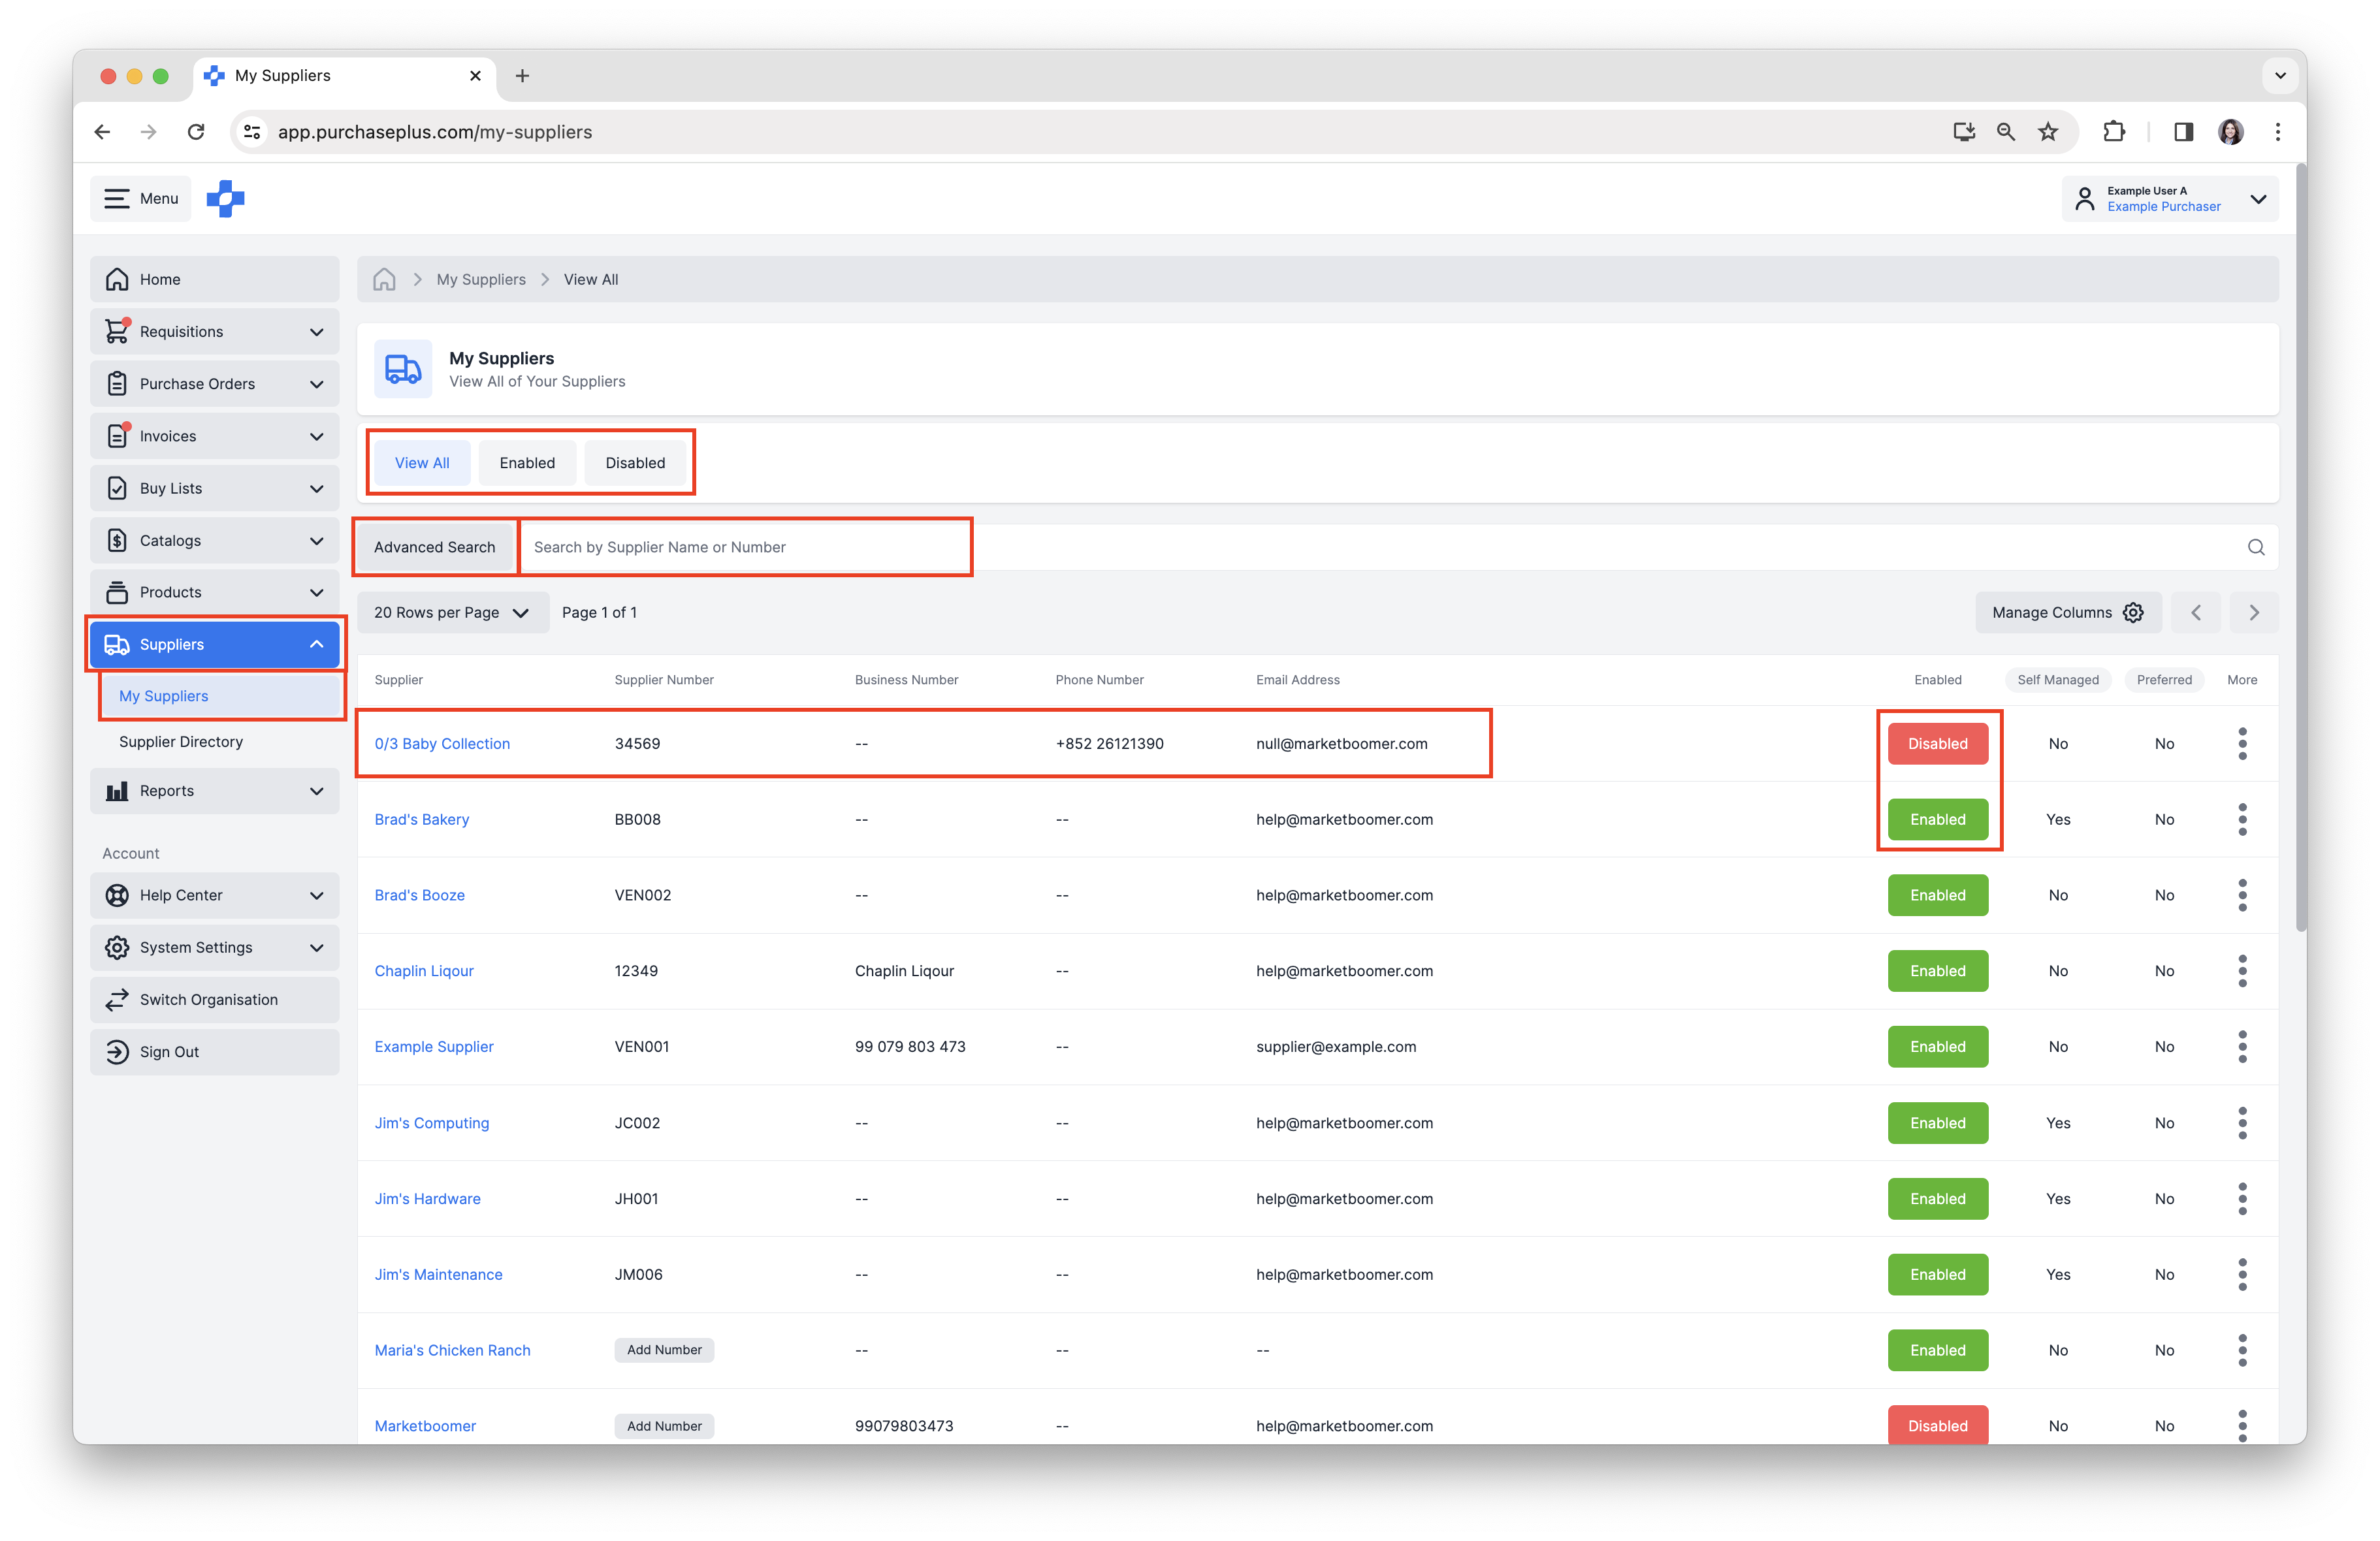
Viewing My Suppliers
1. Select [Suppliers] → [My Suppliers] from the side navigation bar.
2. From this page, you can complete the following actions as required:
a. Filter Suppliers by [View All], [Enabled] or [Disabled].
b. Use [Advanced Search] or [Search by Supplier Name or Number].
c. View the Supplier's Profile by clicking on the Supplier name.
d. [Enable] or [Disable] your relationship with each Supplier. See our article Enable or Disable a Supplier to learn more.
Edit Supplier Settings
1. From the [Suppliers] → [My Suppliers] page, click [Supplier Name] to open the Supplier's profile:
 2. Under [General] tab, you are able to edit the following settings:
a. [Enable/Disable] your relationship with the Supplier. You can only trade with Supplier when you have an Enabled relationship.
b. Edit [Supplier Number], if required.
c. Edit [Supplier Location Code], if required.
d. Edit [Key Contact Person] information. Please note: editing this field requires the Supplier to be a Self Managed Supplier, that is owned by your Organisation.
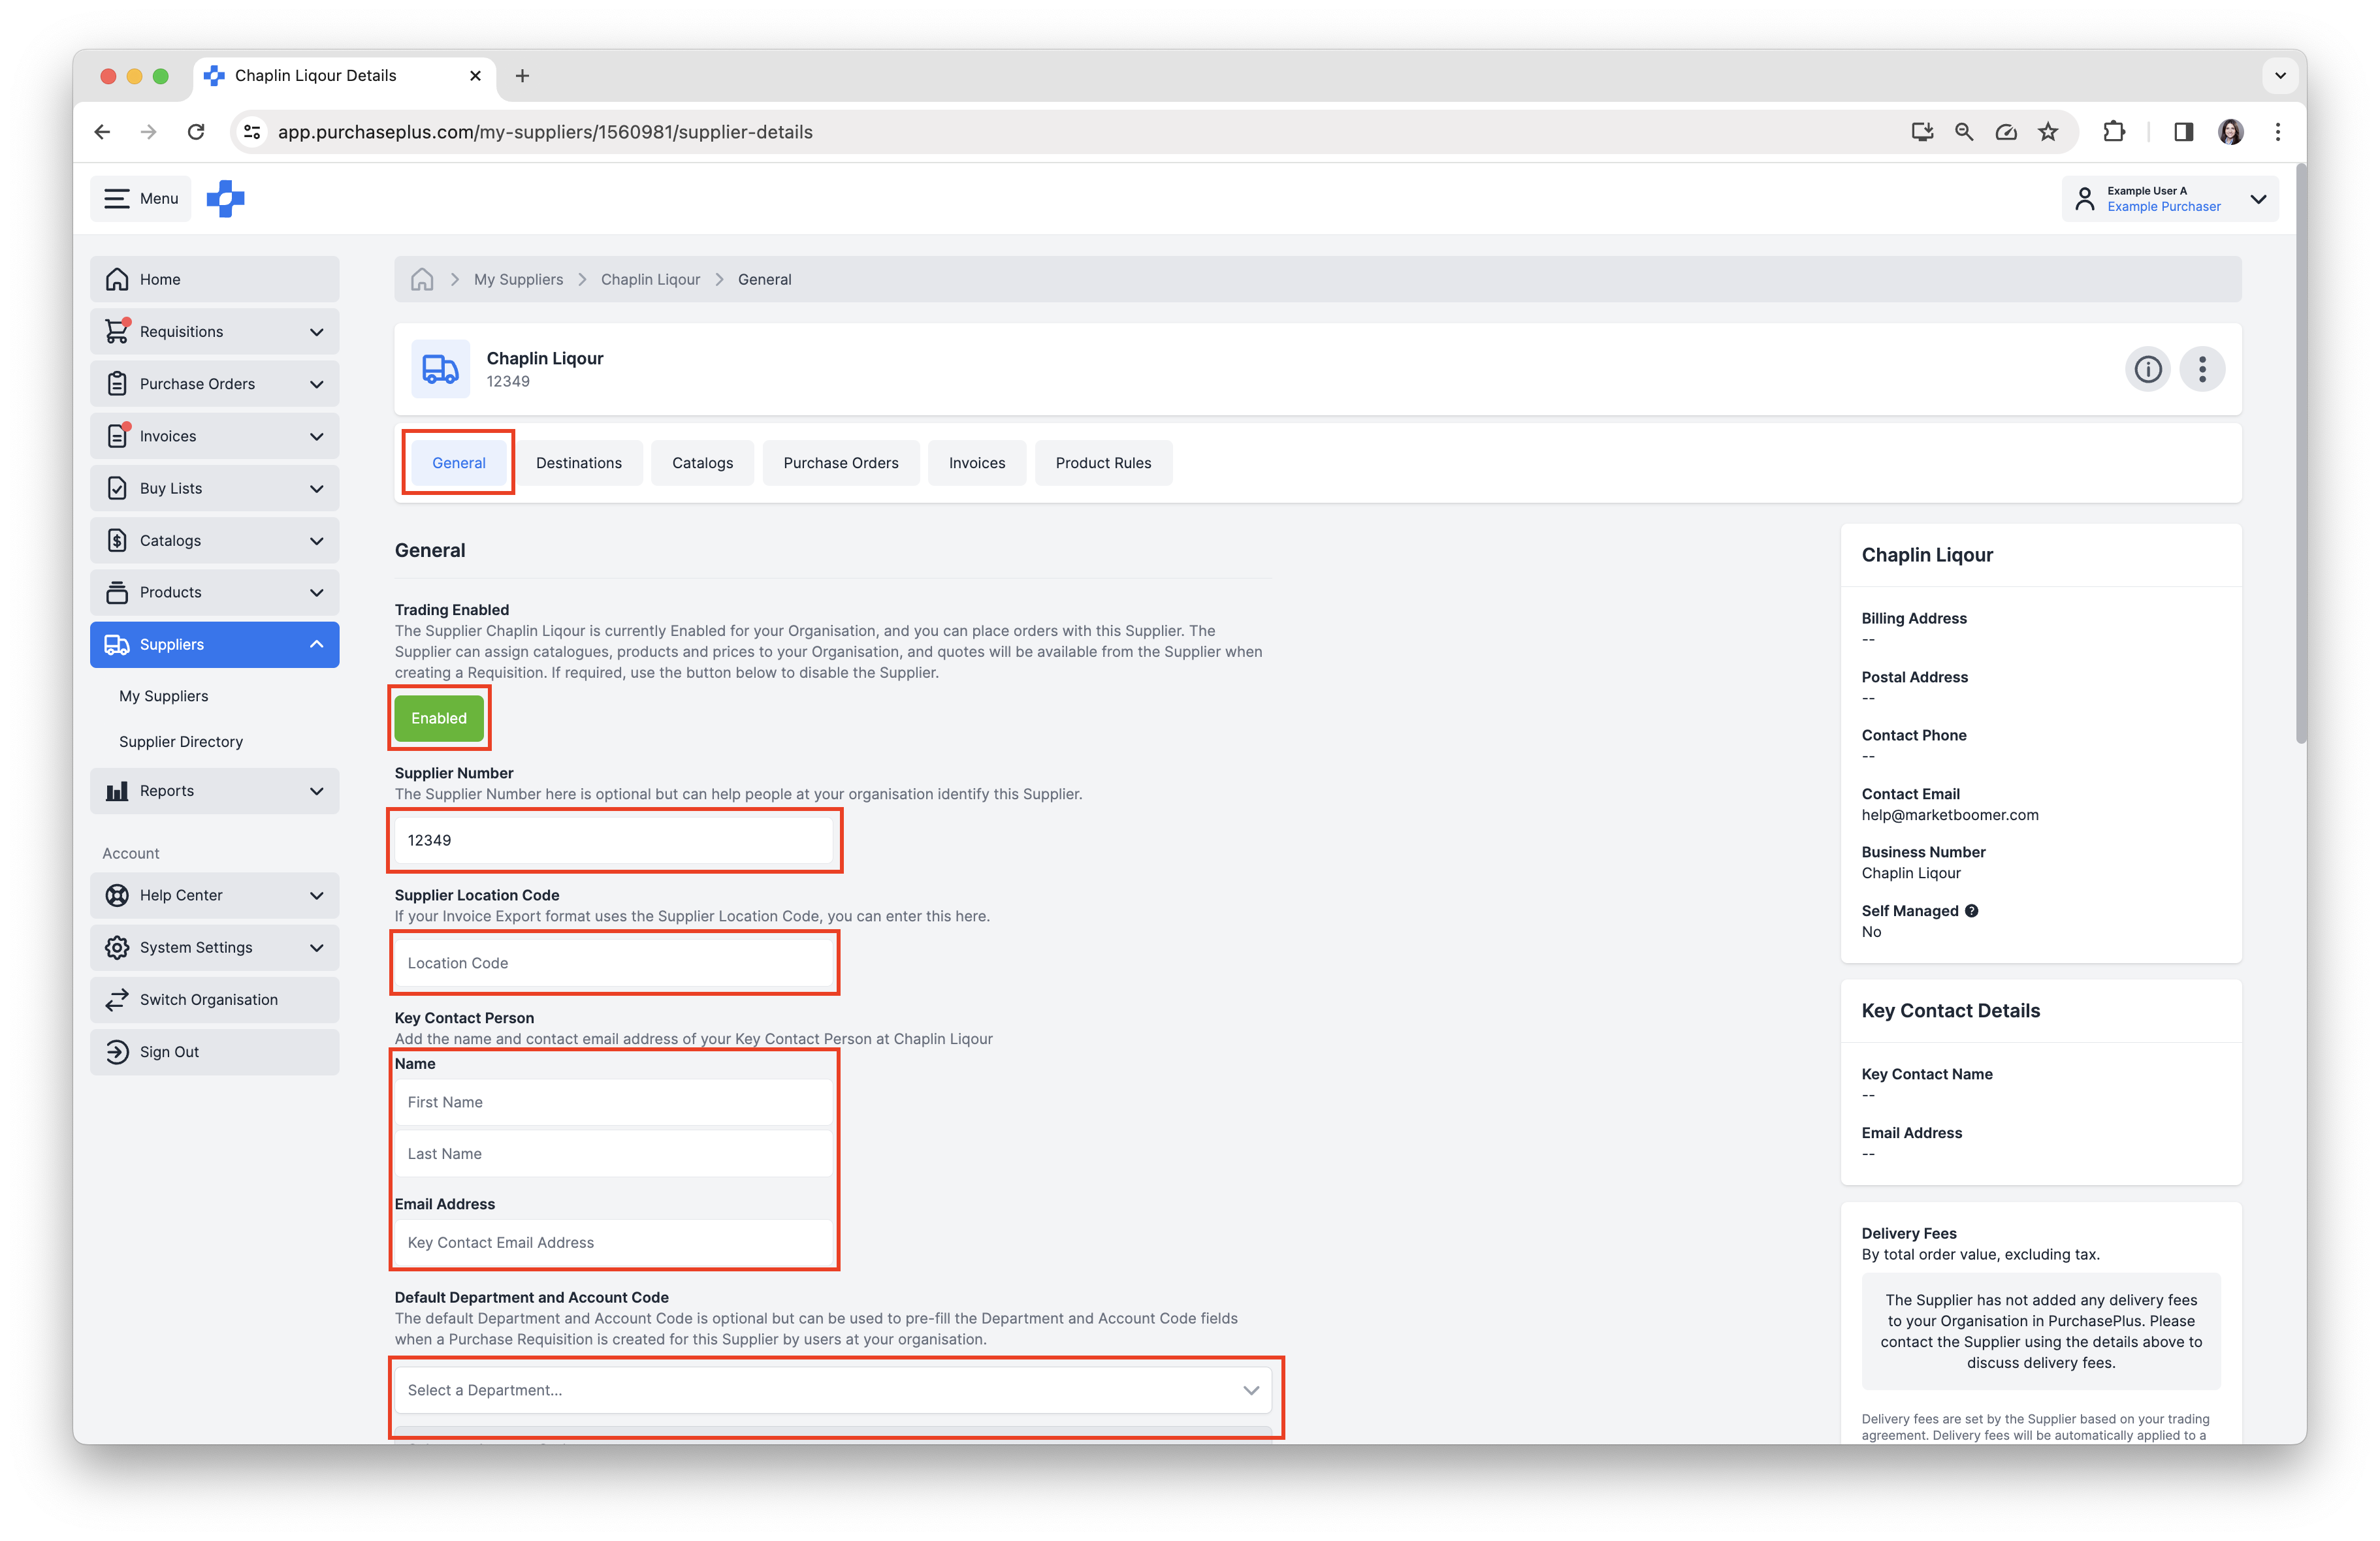
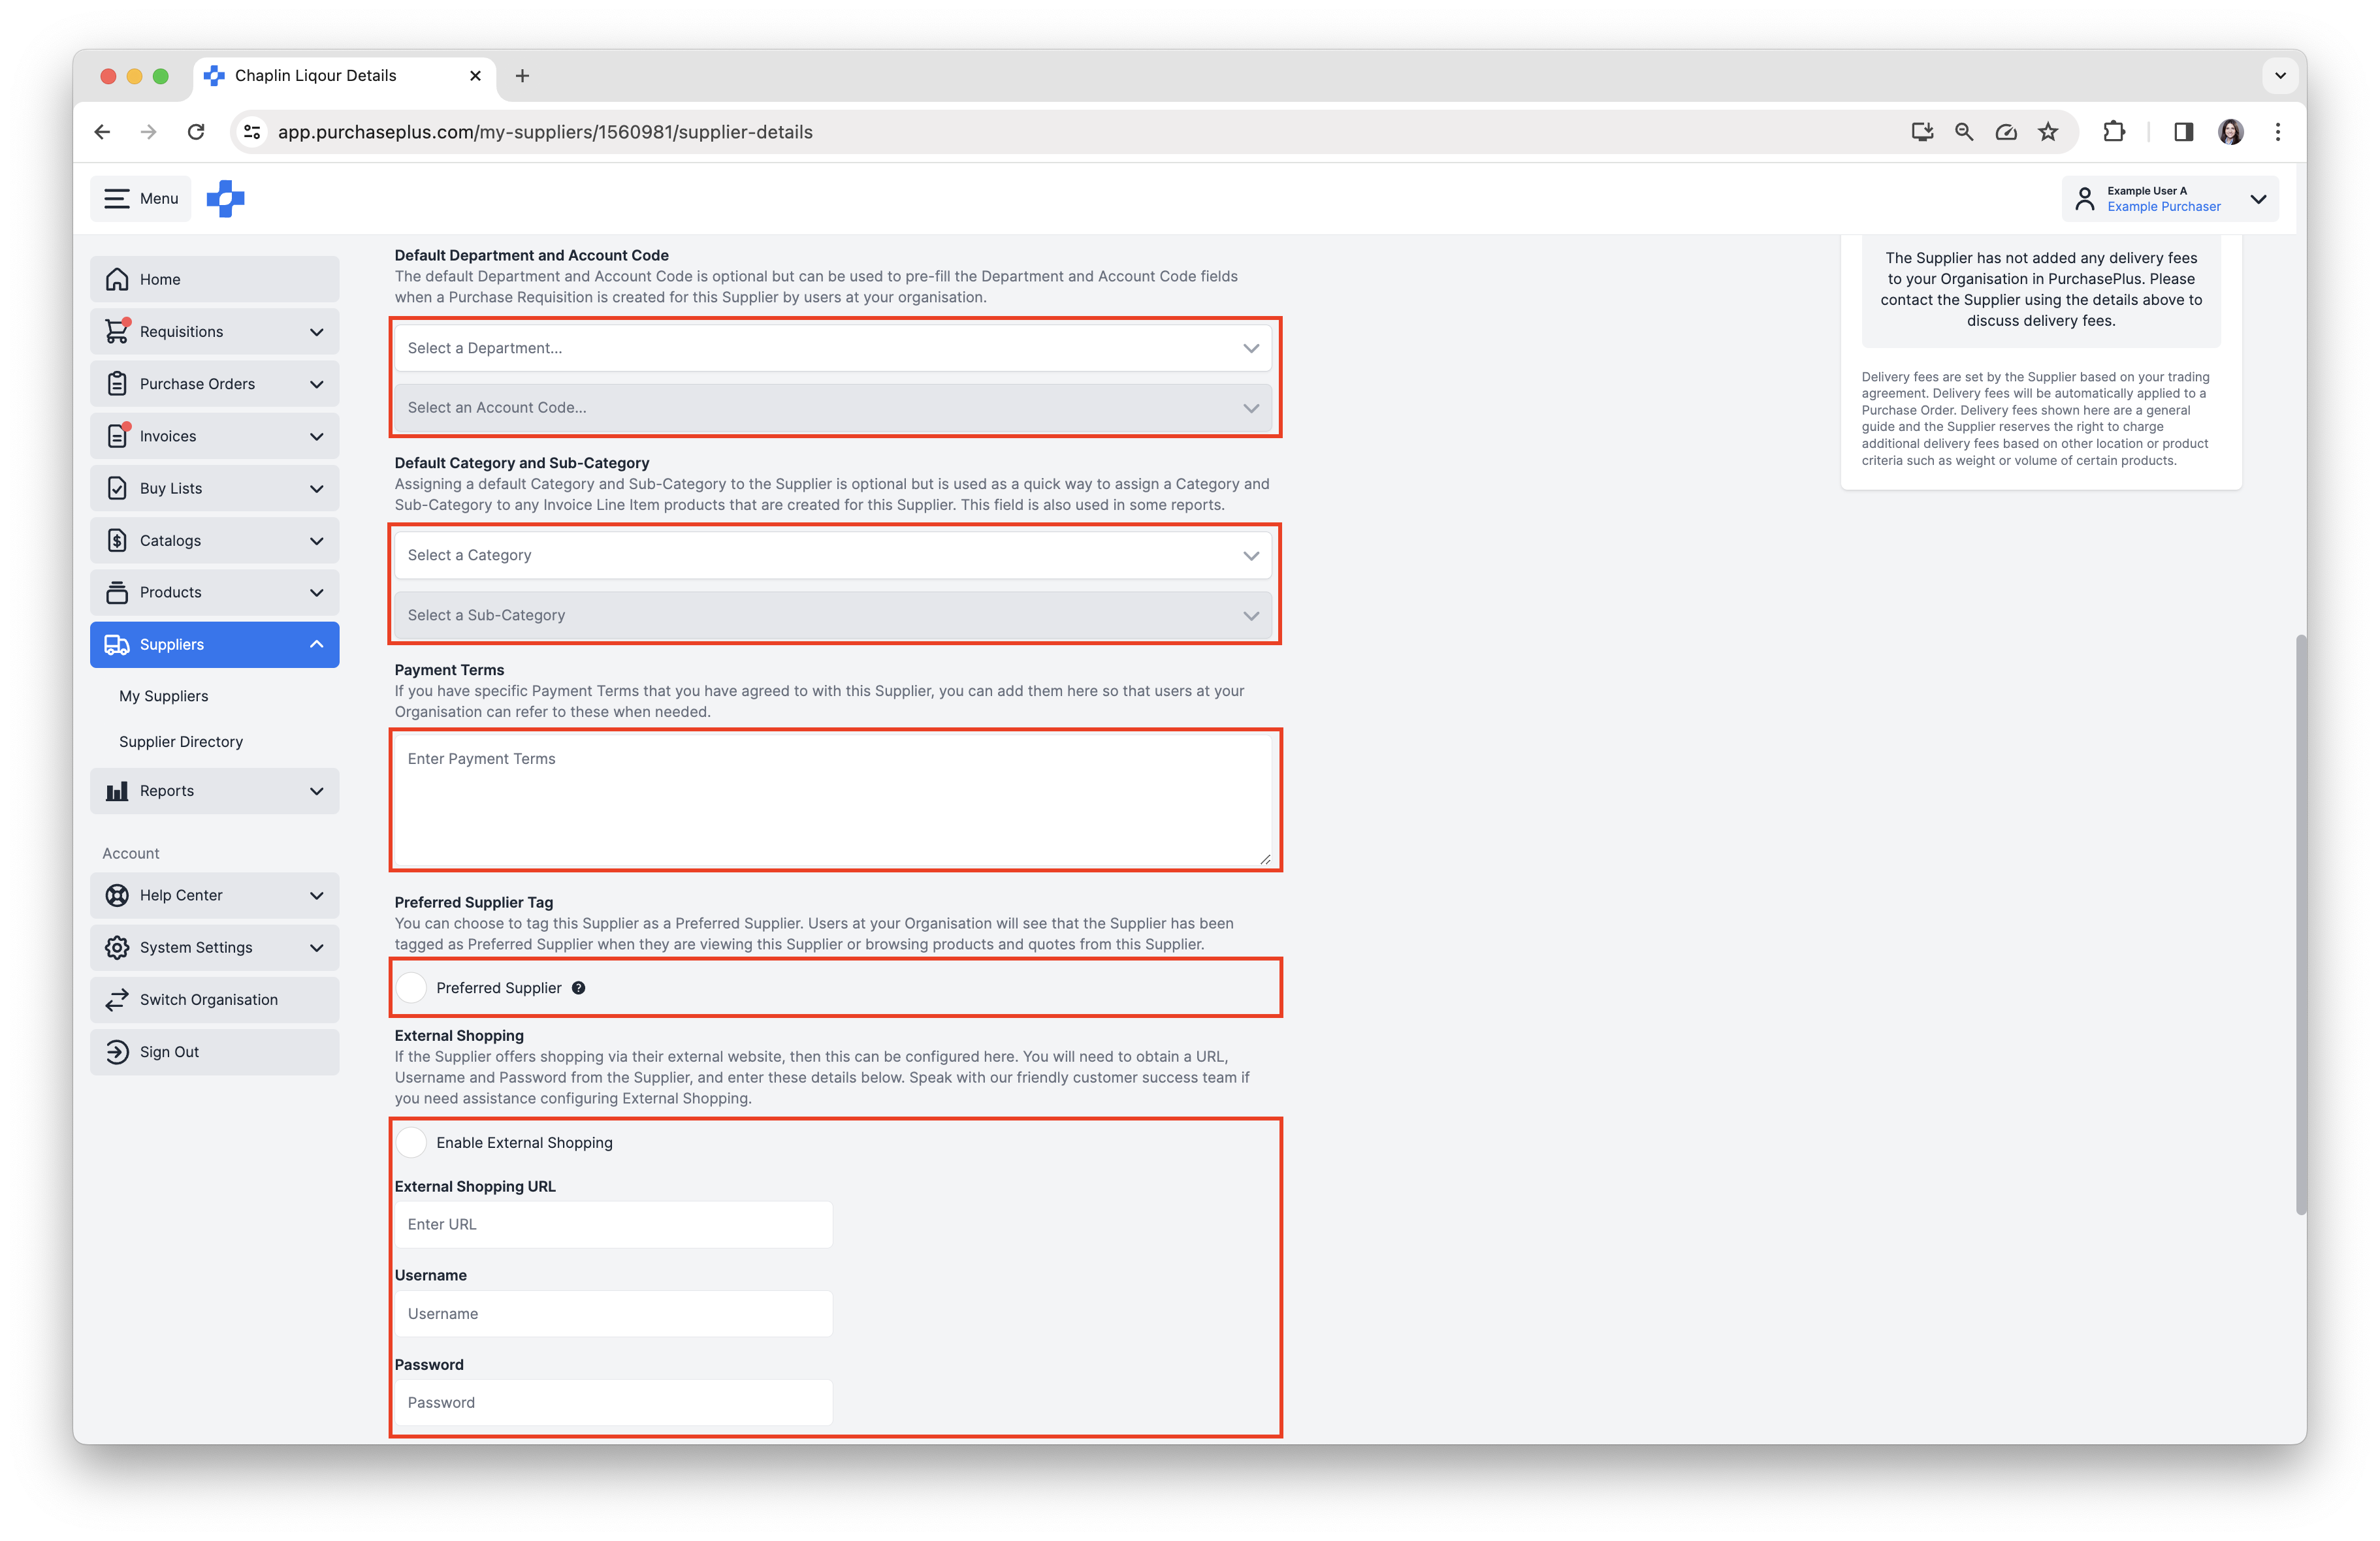
e. Add [Default Department and Account Code]. This will automatically pre-fill the Department and Account Code combination, when creating a Single Supplier Requisition for this Supplier.
f. Add [Default Category and Sub-Category]. This is used as a quick way to assign a Category and Sub-Category to any Invoice Line Item products that are created for this Supplier. This field is also used in some Reports.
g. Enter [Payment Terms]. Payment Terms are any notes that you wish to store here related to your agreement with this Supplier. This field is for note taking purposes only.
h. Select [Preferred Supplier Tag], Users at your Organization will see that the Supplier has been tagged as Preferred Supplier when they are viewing this Supplier or browsing products and quotes from this Supplier when creating a Requisition.
i. Enable [External Shopping]. Some Suppliers offer the ability to create a Requisition by visiting their own e-Commerce website and using the site to populate your Requisition in PurchasePlus. This is sometimes referred to as 'Punchout' in the world of procurement. Please speak with our friendly Customer Support Team if you need assistance configuring External Shopping.
3. If the Supplier is (a) a Self Managed Supplier and (b) you are signed into the Organisation that owns the Self Managed Supplier, there are a number of additional actions you can take on the [Settings] tab. This tab only appears when both of the above conditions are met:
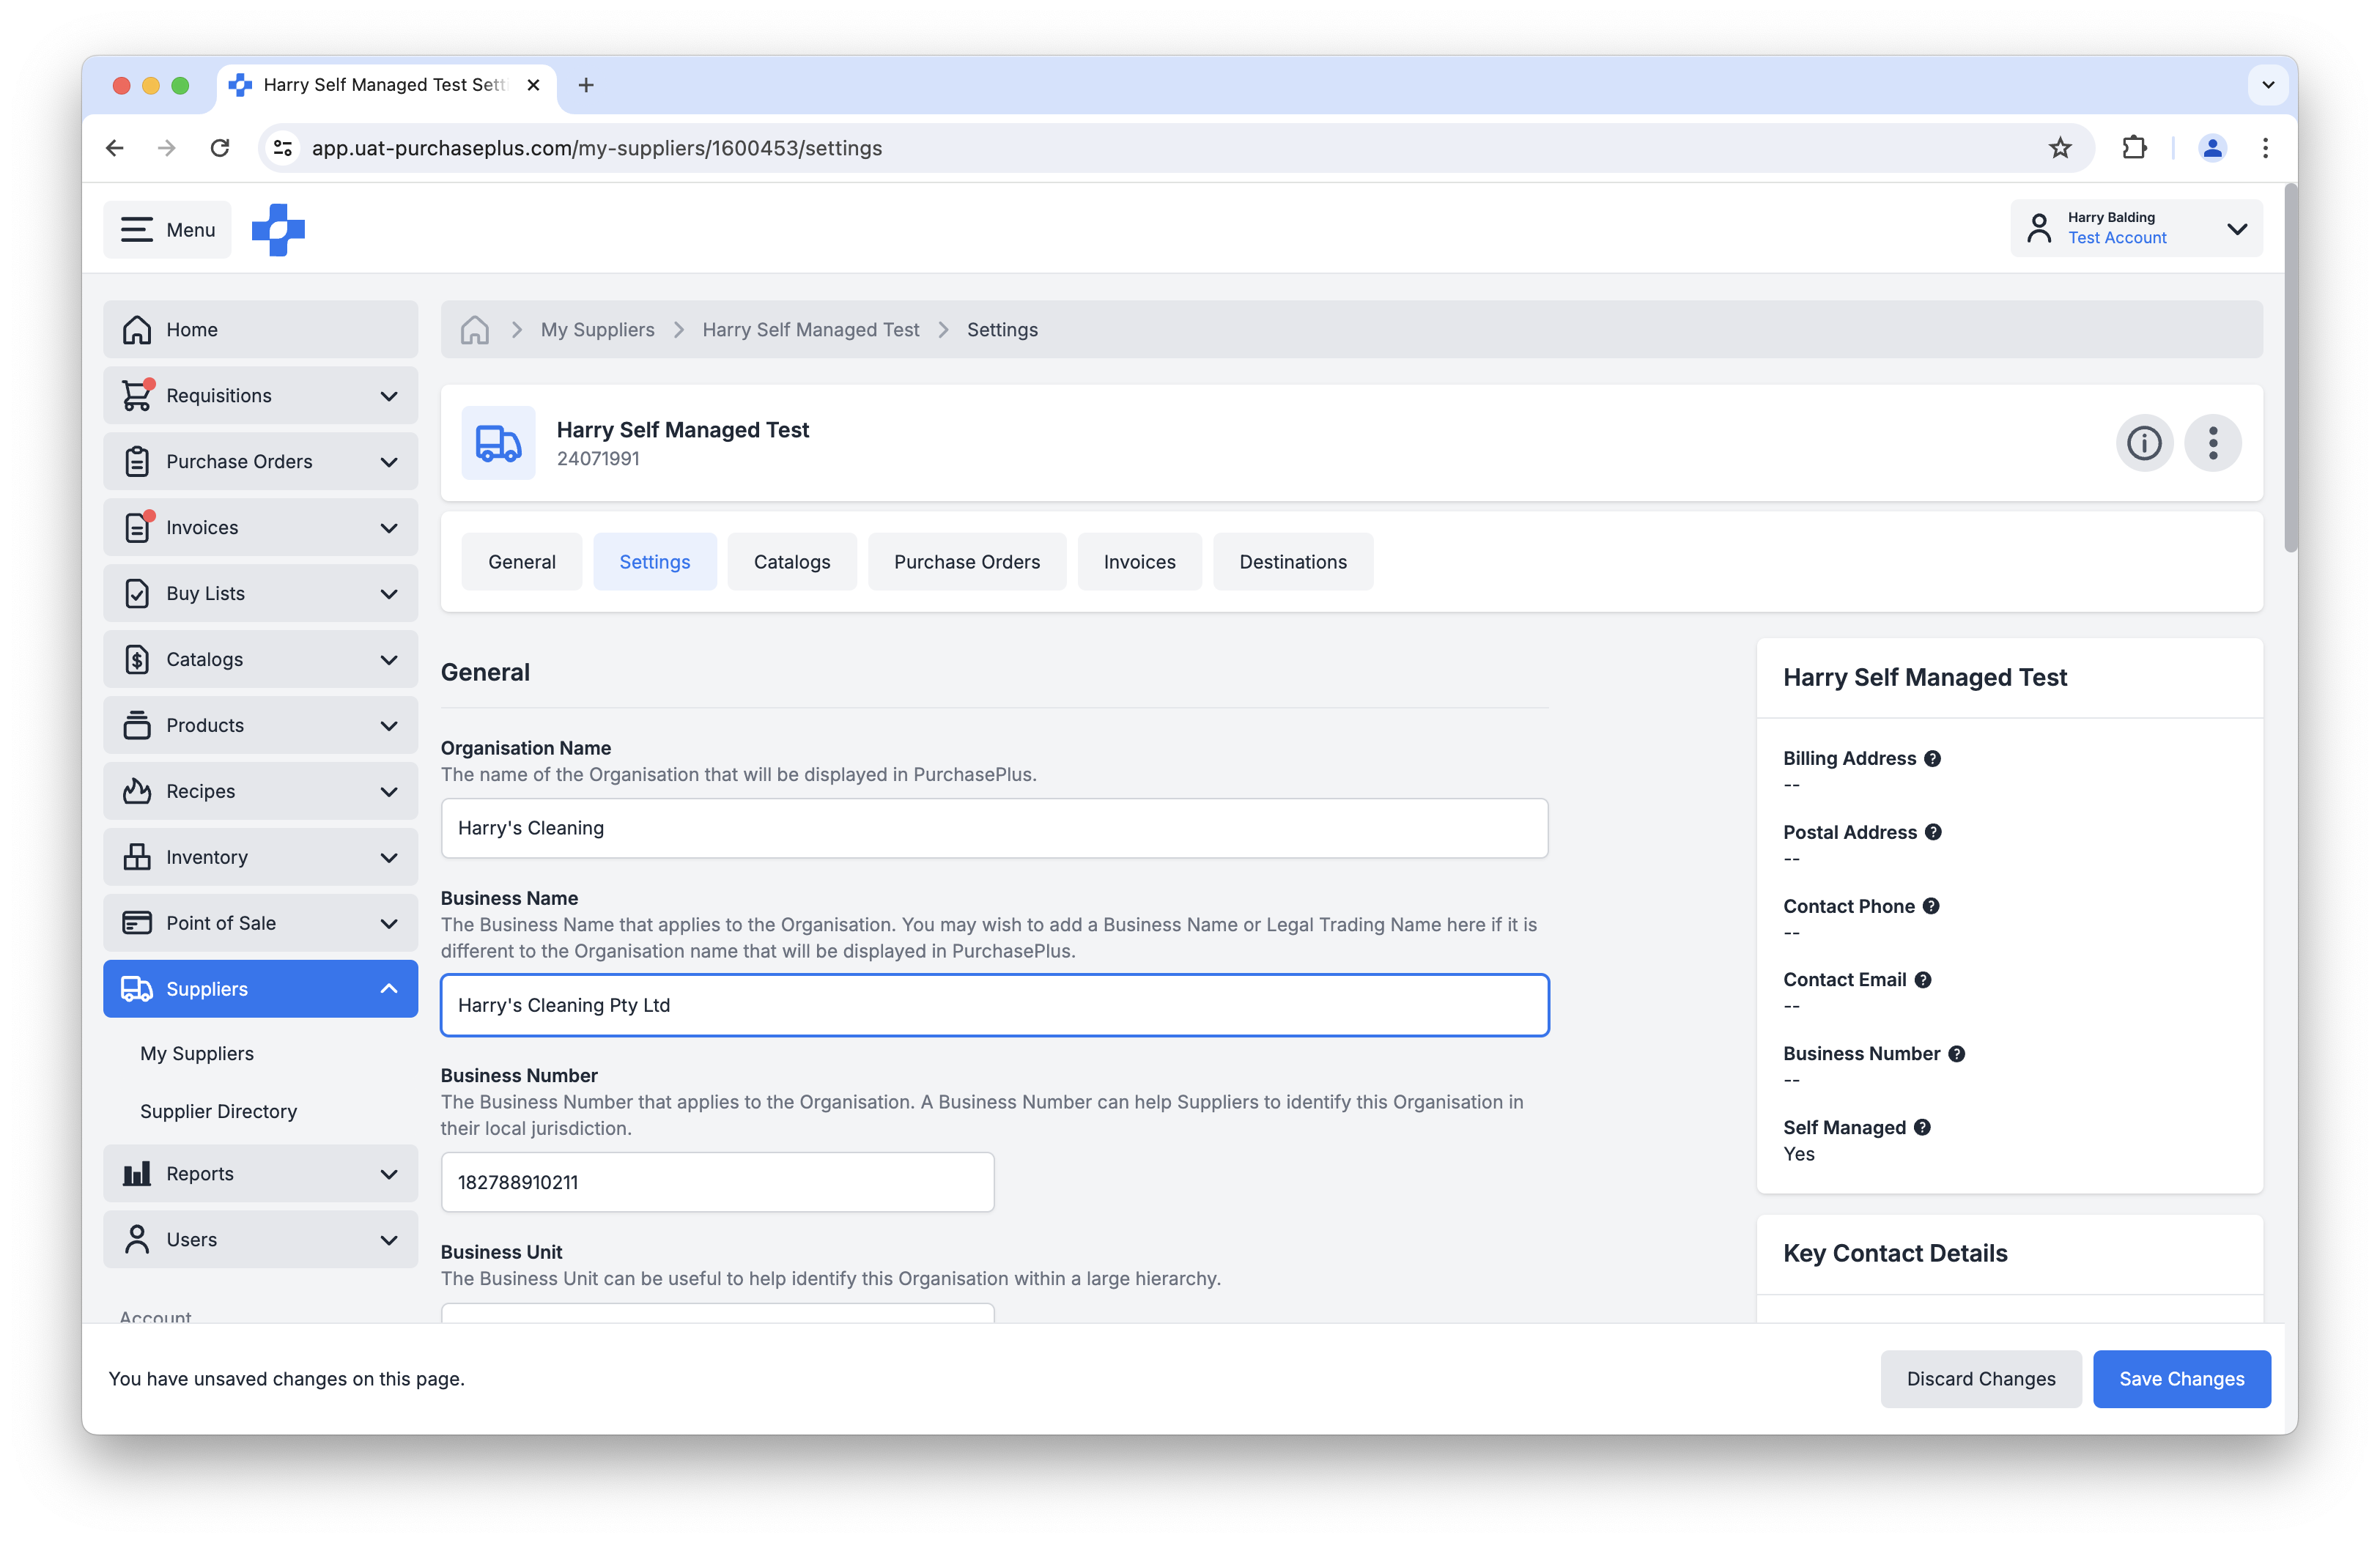 On this tab, you can:
- Change the Organisation Name,
- Change the Business Name,
- Change the Business Number,
- Assign a Business Unit,
- Change the Email Address for the Supplier,
- Change the Contact Phone Number for the Supplier,
- Change the Cost Center Code for the Supplier,
- Assign a Corporate Code to the Supplier,
- Assign a Brand to the Supplier (if applicable),
- Add a Postal or Billing Address for the Supplier.
Please note: If the Supplier is not a Self-Managed Supplier, these options will not be available to you as a Purchaser.
Supplier 'Destinations'
A Destination refers to the email inbox, HTTP, FTP or other location that your organisation electronically sends Purchase Orders to.
To view the Supplier's Destinations:
1. From the [Suppliers] → [My Suppliers] page, click [Supplier Name] to open the Supplier's profile.
2. Select [Destinations] tab:
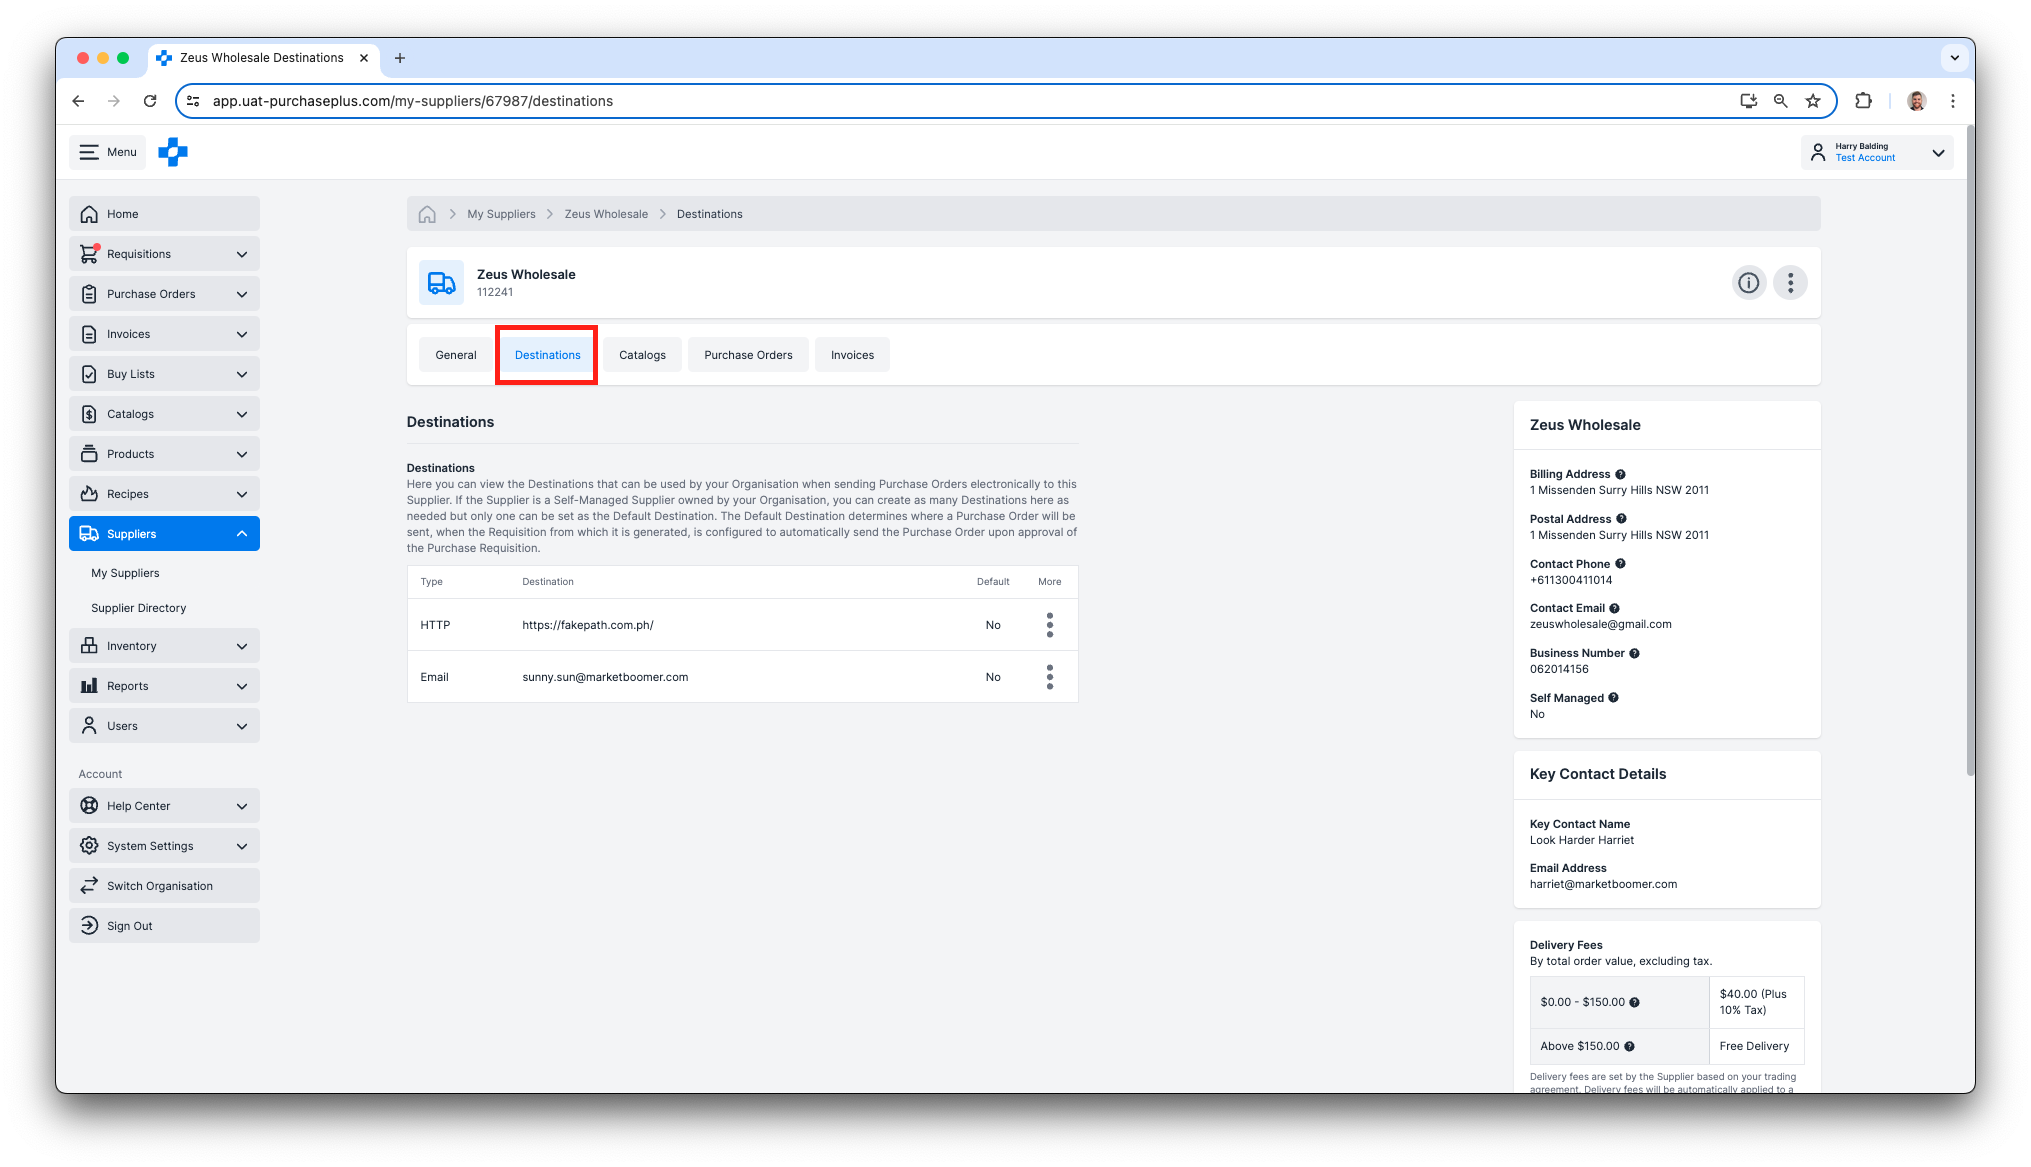
3. If the Supplier is a Self-Managed Supplier owned by your Organization, you can create as many Destinations here as needed, but only one can be set as the Default Destination. The Default Destination will be used when Sending a Purchase Order electronically to the Supplier. If the Supplier is not a Self-Managed Supplier, then you will not be able to add Destinations for the Supplier.
View Supplier Catalogs
1. While viewing the Supplier's profile, select [Catalogs] tab. The Catalogs tab shows all the Catalogs that apply to your relationship with this Supplier.
2. Click [Catalog] to view Products & Prices inside the catalog.
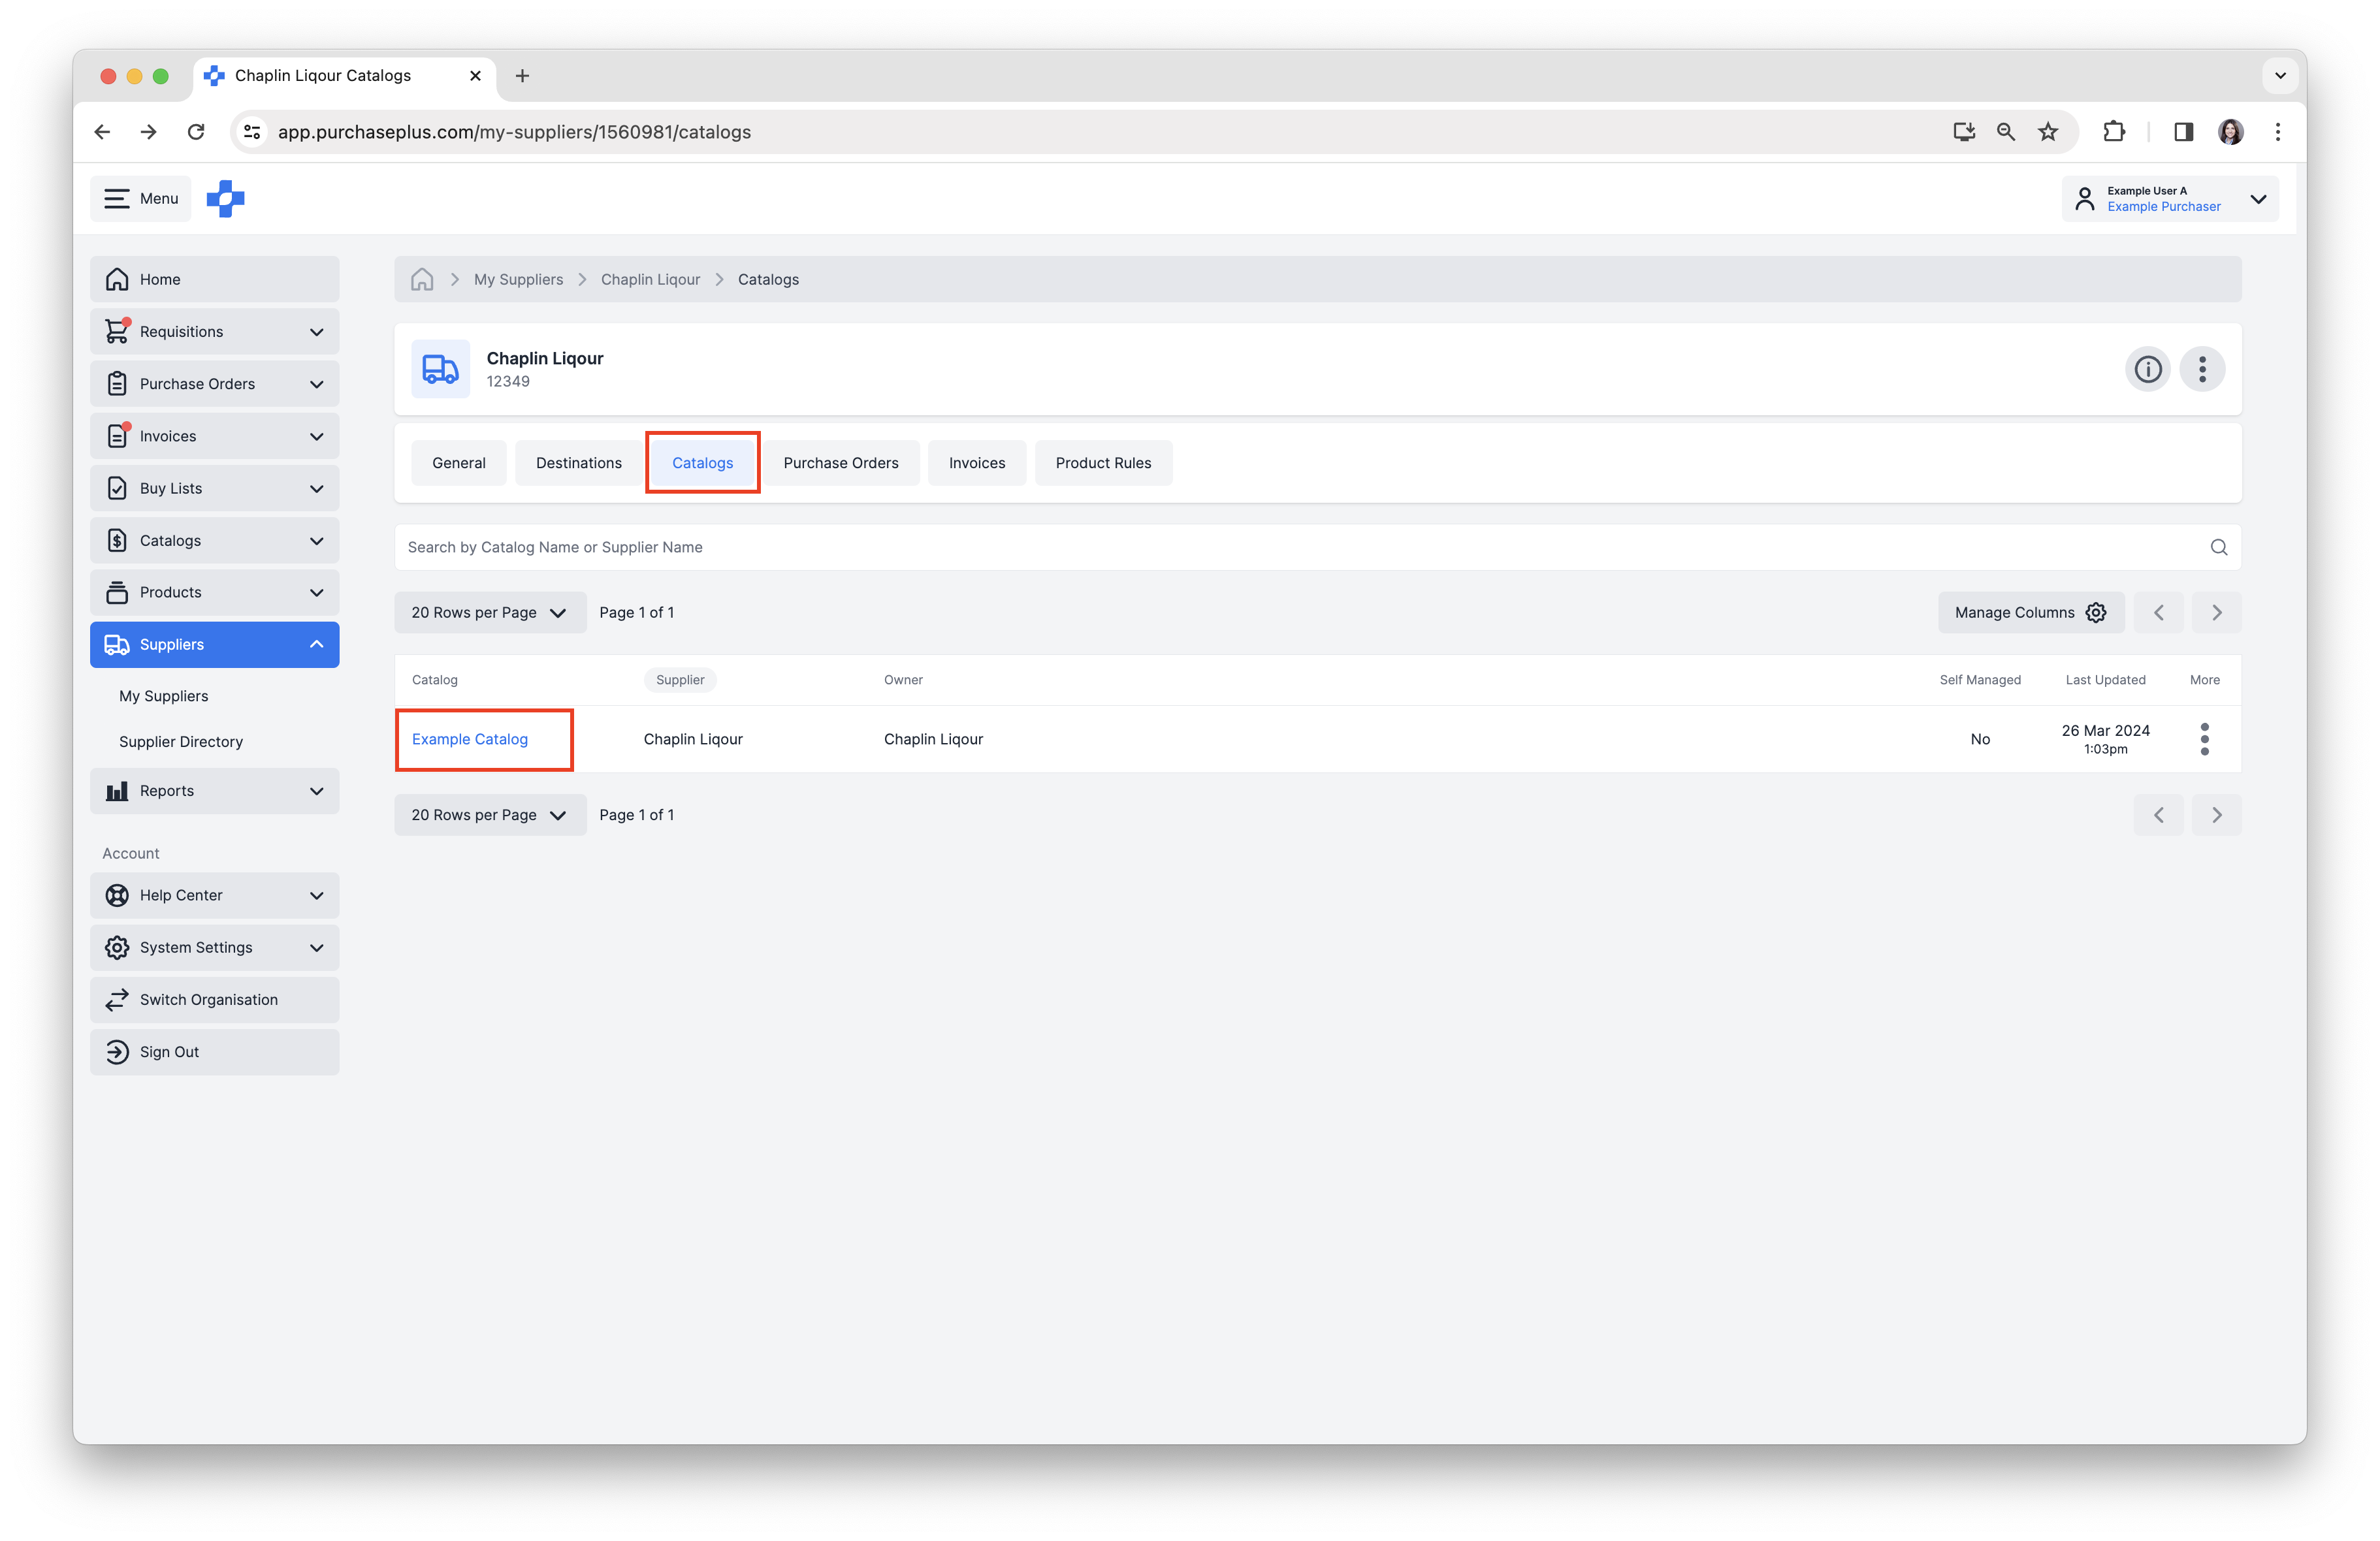
See our help article View Supplier Catalogs to learn more.
Additionally, Purchasers can create and assign a Self-Managed Catalog to their Suppliers.
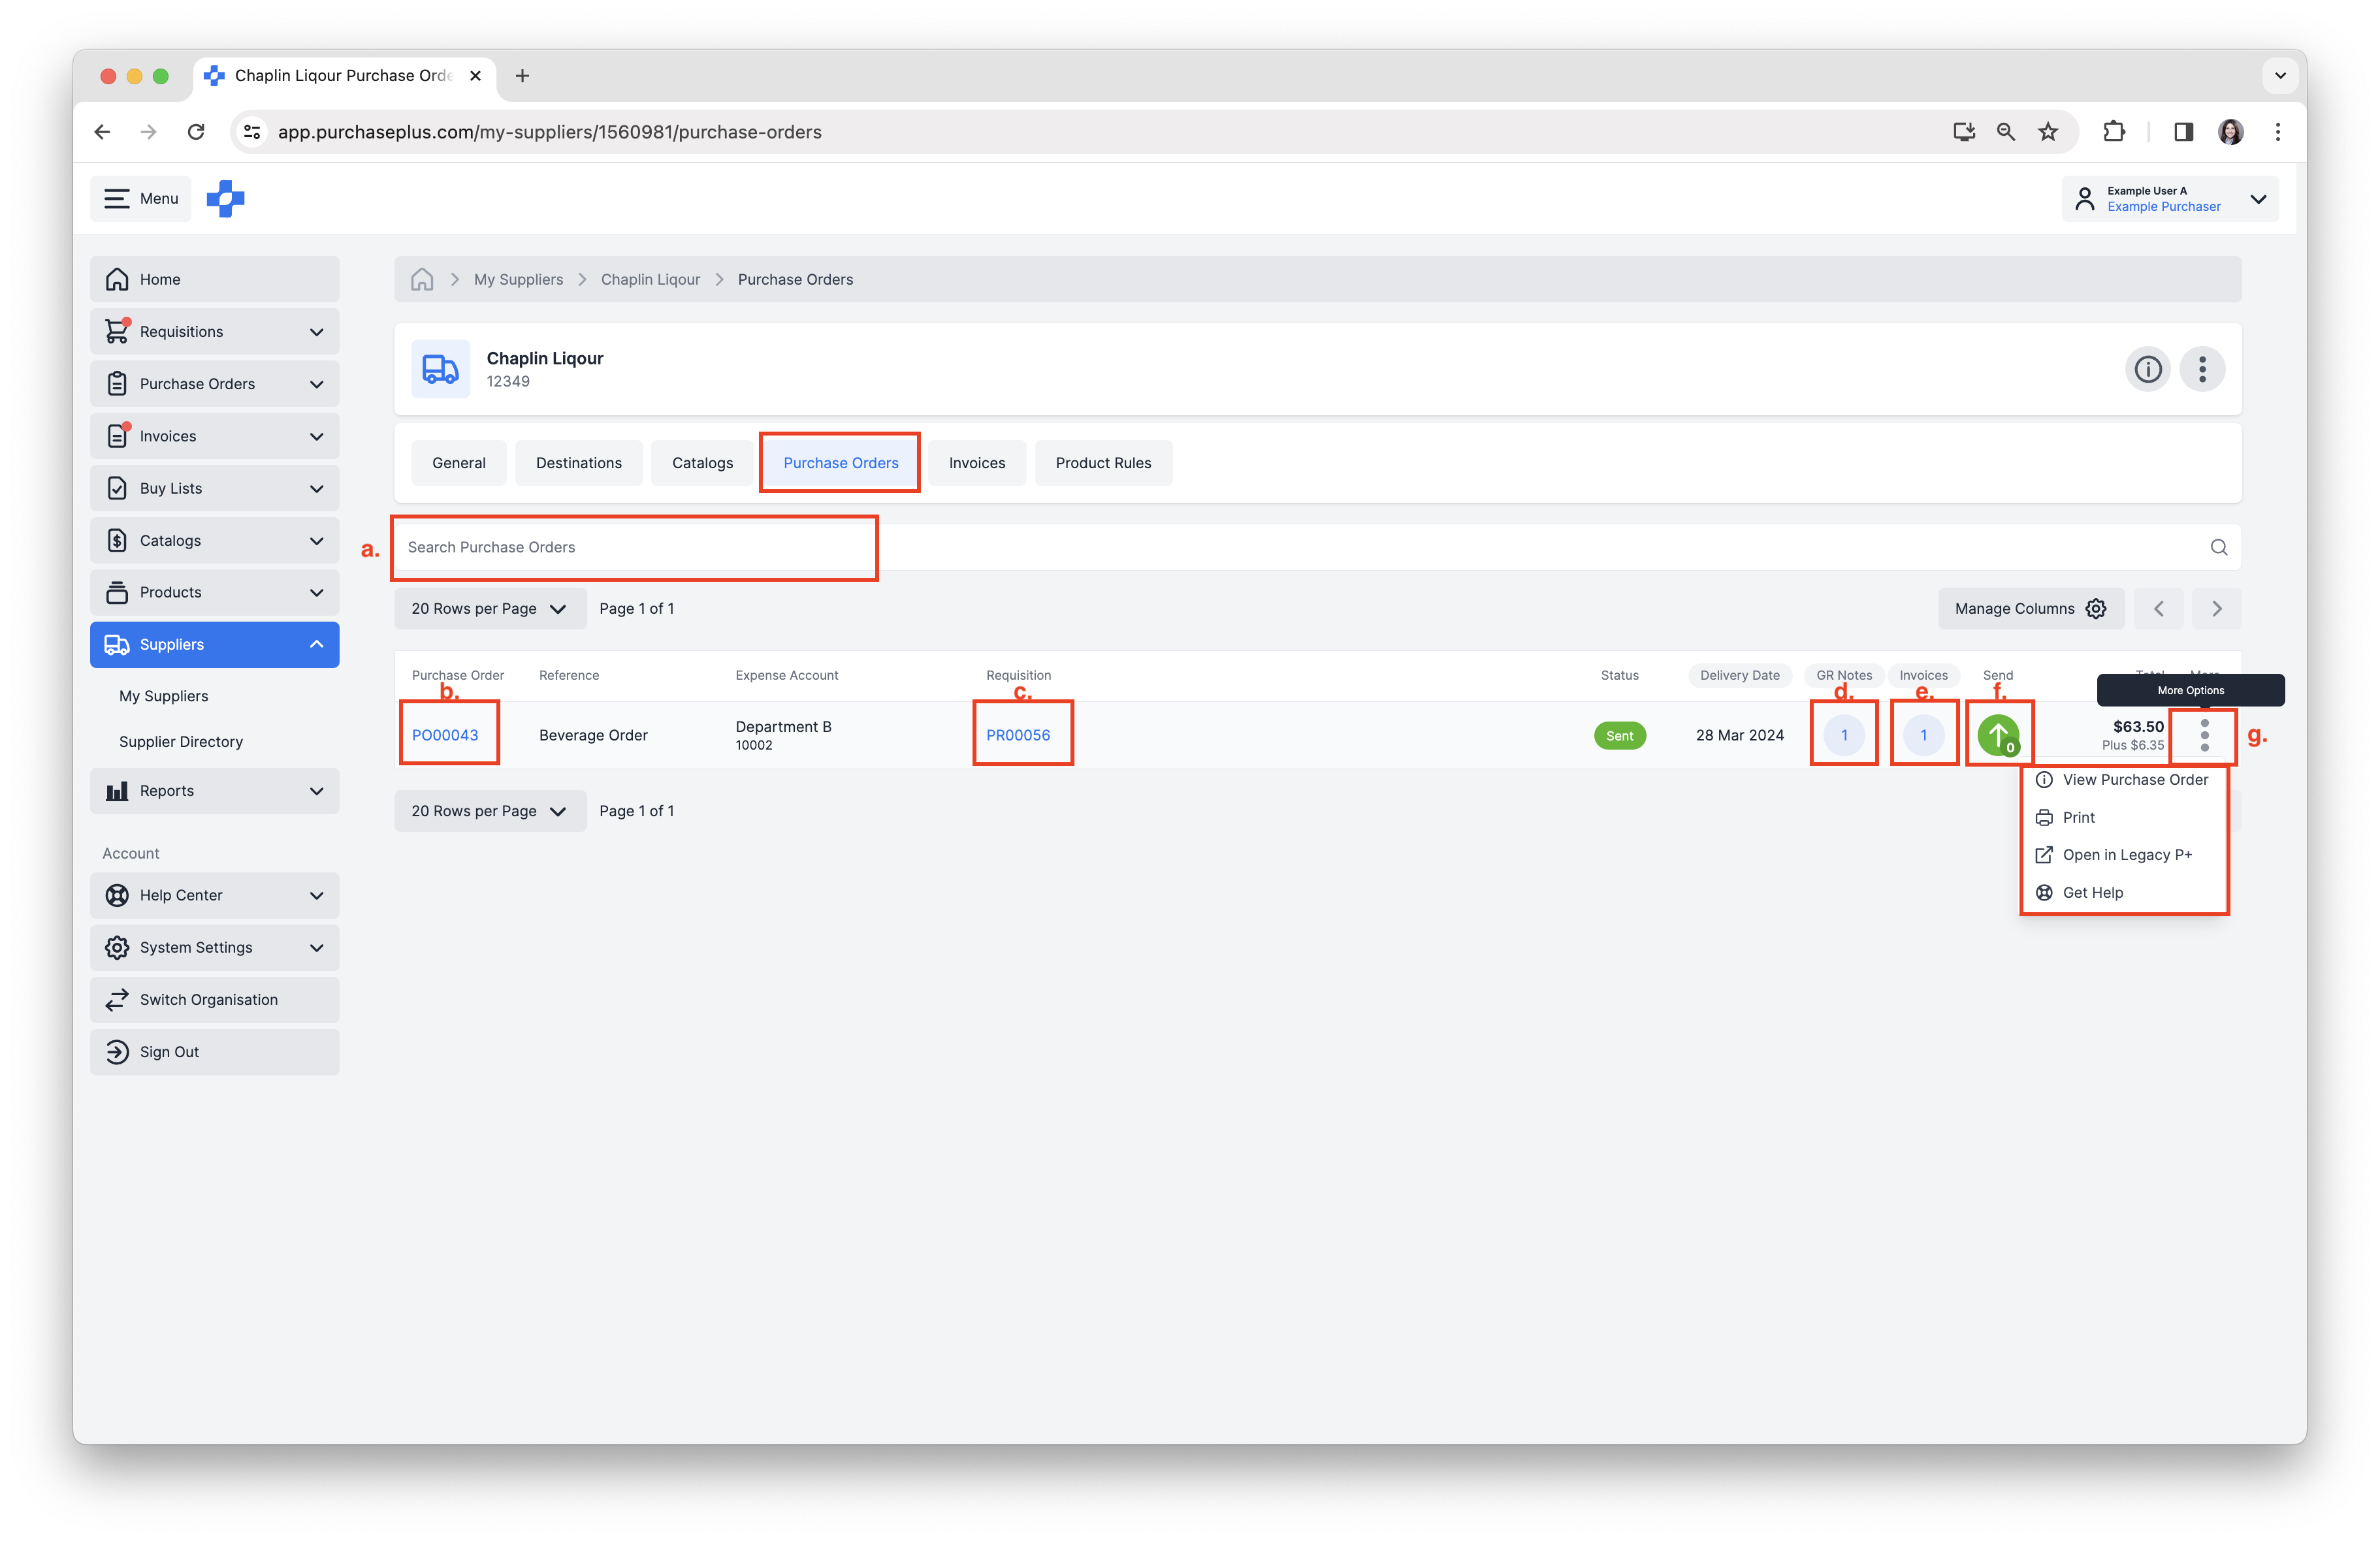
View Supplier Purchase Orders
1. While viewing the Supplier's profile, Select [Purchase Orders] tab.
2. Complete the following actions, as required:
a. [Search Purchase Orders].
b. Click [Purchase Order] to view it.
c. Click [Requisition] to view related Requisition.
d. Click [GR Notes] to view Goods Receiving Notes, or create another GR Note.
e. Click [Invoices] to view related Invoices, or match another Invoice.
f. Click [Send] to view send details, or to send Purchase Order to Supplier.
g. Click [More Options] → [View Purchase Order] → [Print] → [Open in Legacy P+] → [Get Help].
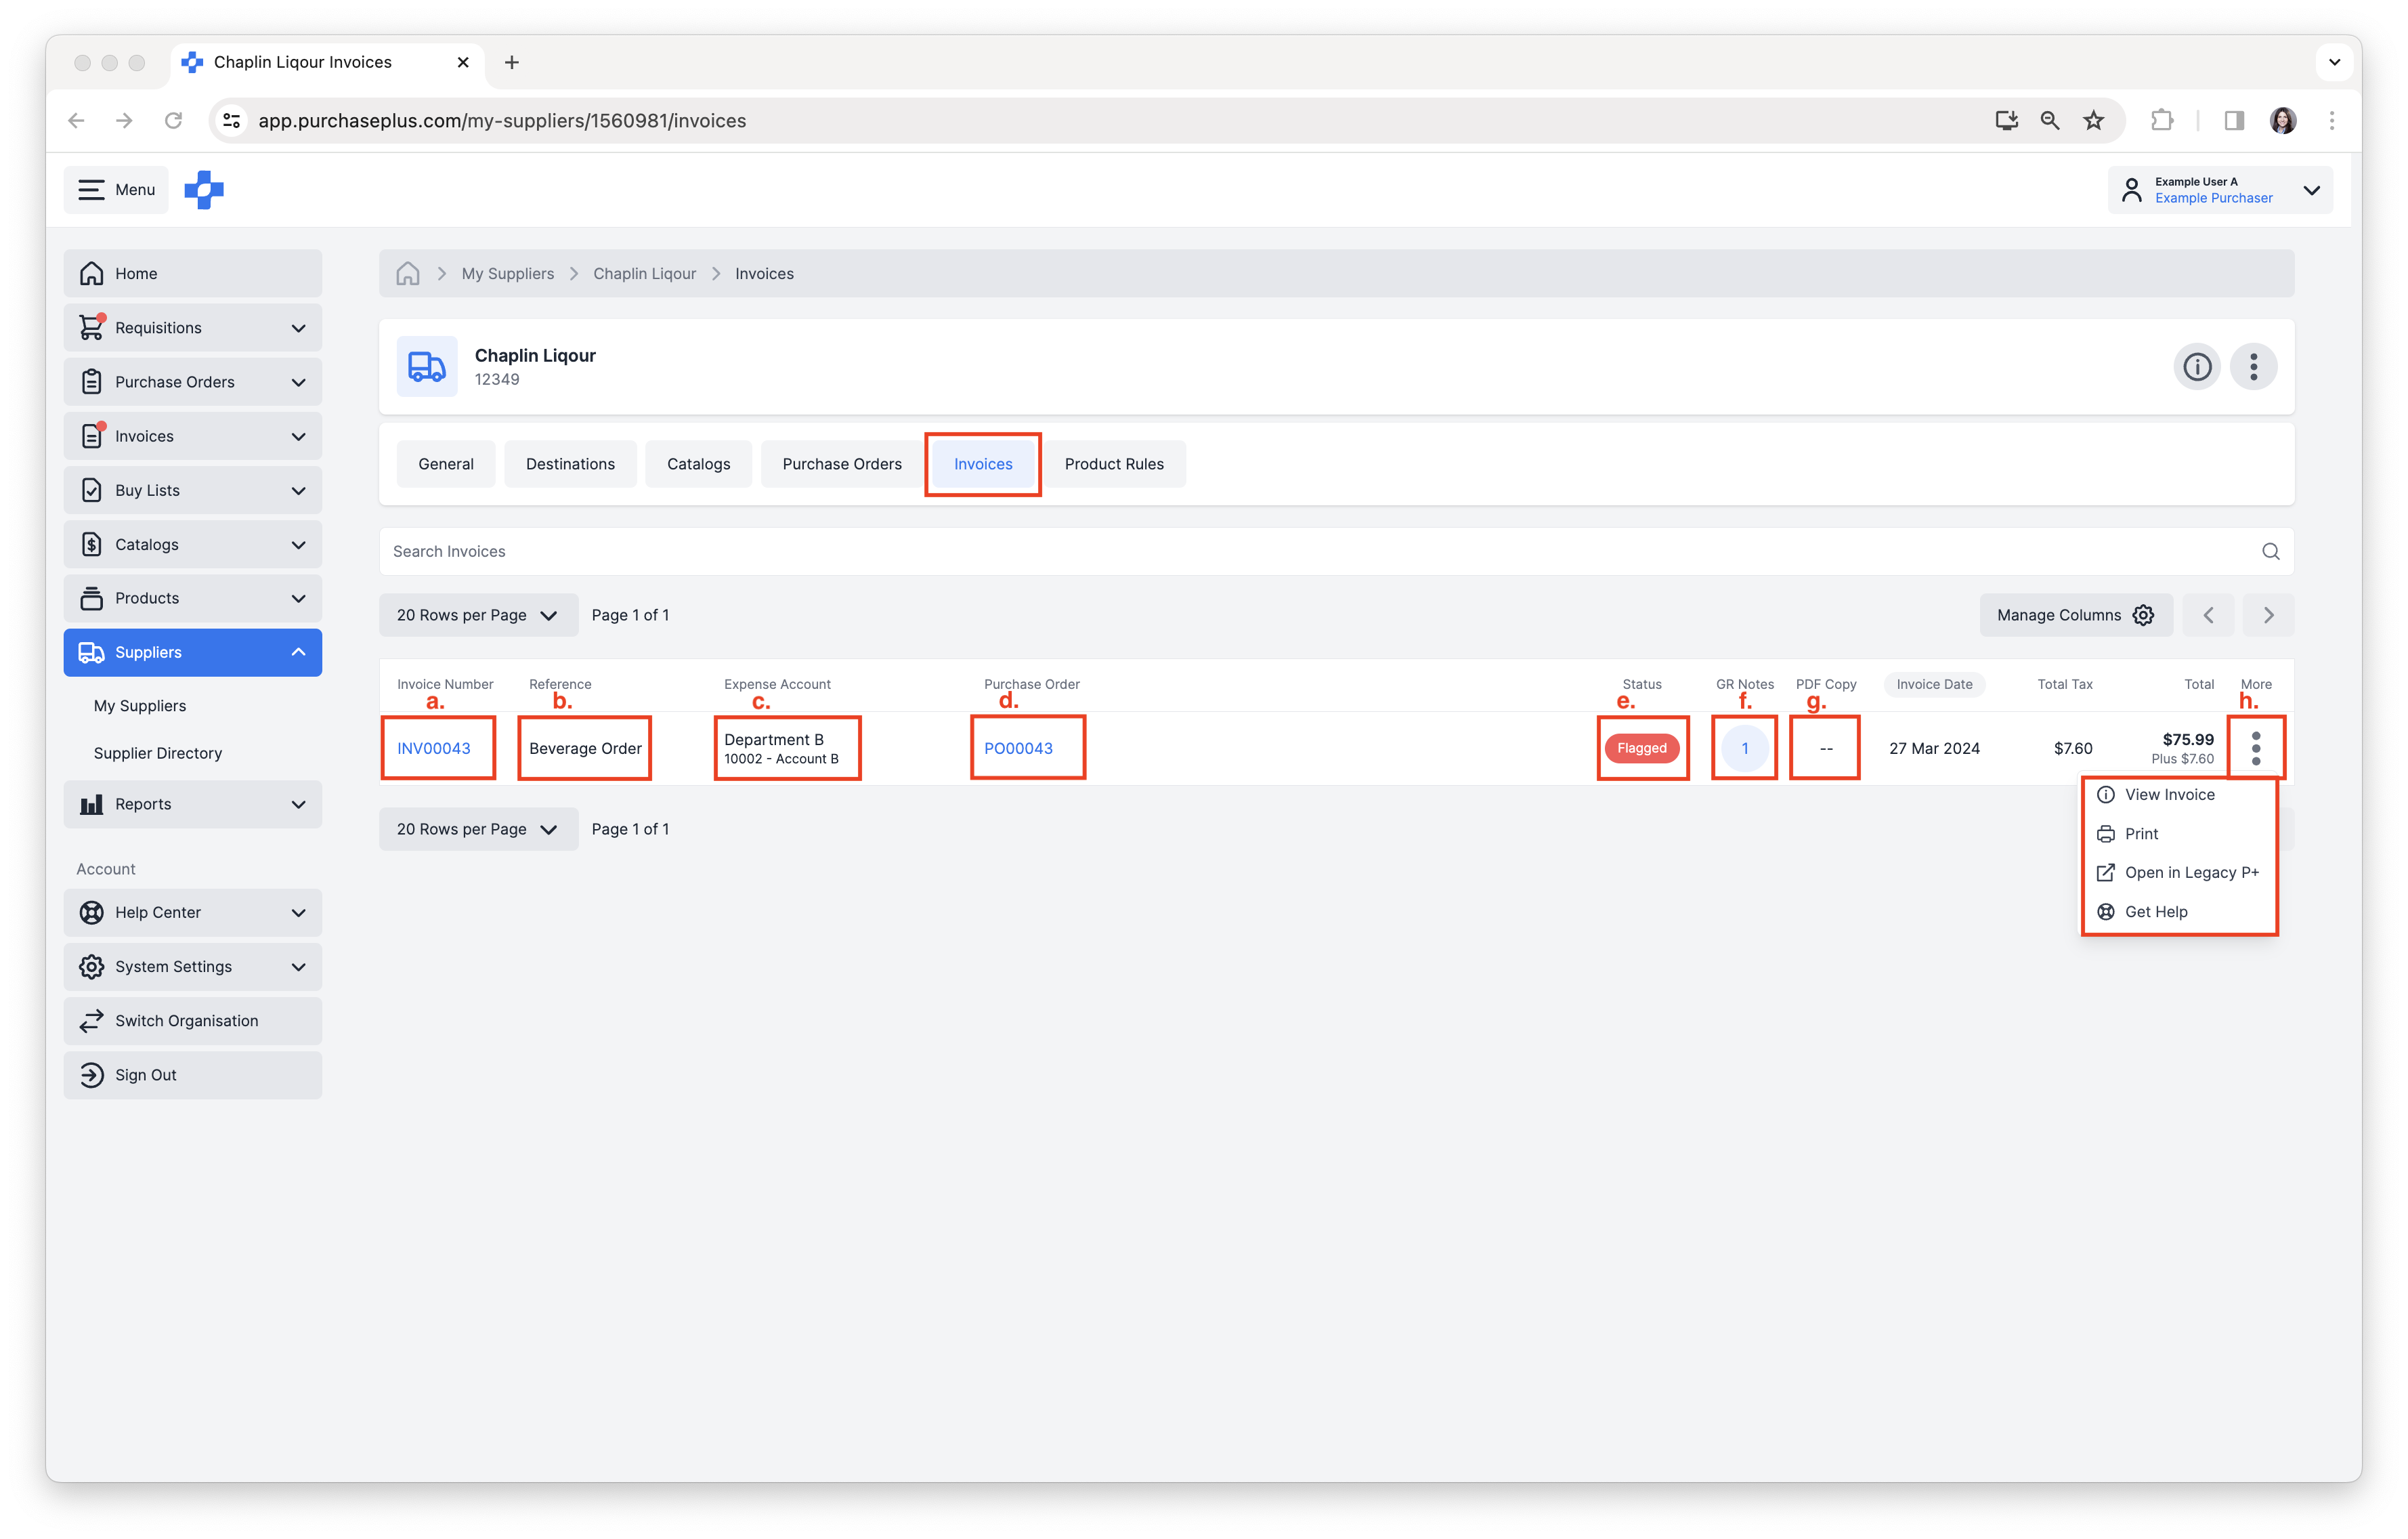
View Supplier Invoices
1. Select [Invoices] tab.
2. Complete the following actions, as required:
a. [Search Invoices].
b. Click [Invoice Number] to view.
c. Click [Reference] or [Expense Account] to edit information.
d. Click [Purchase Order] to view.
e. Click [Status] to view Invoice Status and Approvers.
f. Click [GR Notes] to view Goods Receiving Notes, or create another GR Note.
g. Click [PDF Copy] to view PDF of Invoice, if available.
h. Click [More Options] → [View Invoice] → [Print] → [Open in Legacy P+] → [Get Help].